Today, shooting videos has never been easy. If from before you need to buy digicams or camcorders just to capture precious moments, the present technology allows you to record things with your smartphone. And when it comes to popular mobile phones that offer the best video recording experience, iPhone tops them all. It features a high quality camera capable of taking photos and videos in stunning quality.
However, there will come a time that those videos stored on your phone need to be deleted. You may need to save some space on your memory, delete embarrassing moments, protect your privacy and clean up your device, these are just some of the most common reasons why one needs to delete videos on iPhone.
But removing videos on iPhone doesn’t come as easy as counting 1-2-3! Too technical process, deletion errors, missing “delete” option, sync problems, incomplete deletion are just some of the issues facing iPhone consumers.
Top Four Solutions to Erase Videos from your iPhone
Solution 1: Delete iPhone Camera Roll Videos Directly
- On your iPhone’s main interface tap the “Camera” icon.
- Hit the “Camera Roll” on the lower left corner.
- When a new toolbar above appears, select “Camera Roll”.
- Hit the “Videos” tab.
- Tap “Select” icon located on the bottom center.
- Choose the videos you want to delete.
- Click the “Delete” icon and select “Delete Selected Videos” to confirm.

Note: This approach is applicable for videos taken on your iPhone camera.
Solution 2: Delete Downloaded or Transferred Videos in Video App on iPhone
When it comes to downloaded or transferred videos, removing them from your device is a bit tricky. Most of the time you’ll need to connect your phone on Mac or PC and use iTunes to delete the stuffs you don’t want. But what if you are nowhere near your PC? Or you don’t have the iPhone cable with you? How to delete videos downloading or transferred to your iPhone? See below.
- Open the “Videos” application on your device.
- A video list will appear and manually choose the clips you want to delete.
- Swipe each video to the left.
- A “Delete” button should appear on the right.
- Hit the red “Delete” button to remove videos from your phone.

Two of the above methods on how to erase videos from iPhone takes very little effort and knowledge to clean up your device. However, they are not guaranteed to work 100% of the time. Many users are reporting errors deleting transferred, downloaded, received, and even iTunes synced videos. Add to this fact is that erased videos are not permanently removed from your iPhone, they can still be recovered! So if you want to permanently eliminate videos saved on your iPhone without leaving any trace at all, check out next solutions.
Solution 3: Delete iPhone 6 Videos Quickly
Apowersoft Phone Manager is a third party application specialized in managing iPhone and Android smartphones. This tool helps users quickly and safely deal with files management, which includes the abilities to backup, sync, transfer and delete any type of files including messages, pictures, music, apps etc. There is no worry about the compatibility of this app with your phones. You can easily delete iPhone 6 videos, rather than other types of iPhone. This free tool stands out against other similar apps for its big convenience and fast speed. See steps below to learn how to use it:
- Download this app and connect through USB cable after launching it.
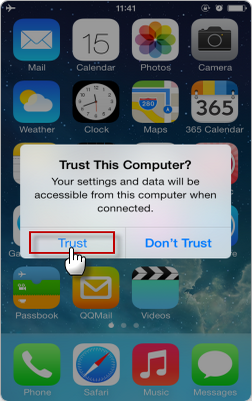
- Hit “Trust” button if you confirm connecting your device with the PC.

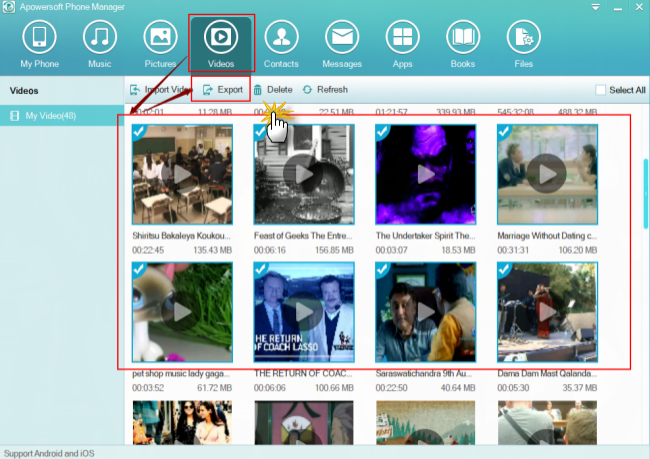
- Enter the main interface and then click the “Videos” icon.

- Left click the videos and then tap on “Delete” button.
- Hit “Select All” for deleting all iPhone videos available.
Apart from deleting videos on your iPhone, this phone manager is also developed with functions of “Import” videos from computer and “Export” videos for transferring to PC. With this magic tool, you will feel rather easy to manage your videos on iPhone and Android smartphones.
Solution 4: Permanently Delete Videos on iPhone
The iPhone data cleaner is a security application that can delete iPhone videos, pictures, music, documents, files, passwords, accounts, contacts, SMS, MMS, apps, bookmarks and all others. It offers two erasing modes with partial or complete clean. And three data erasing levels are available, Low if you want to remove data quickly, medium for overwriting deleted or existing data, and high to remove stored passwords, bank account info, user IDs and other private files.
- Connect your iPhone on PC using the supplied USB cable.
- Launch this software and wait until it automatically recognizes your device.
- On the main interface choose “Erase deleted files”.

- Depending on your needs, select the appropriate data erasing level.
- Hit “Start” icon to begin the cleaning process.
- Once complete, tap “Done” and from here you will see how much space you have saved.
The beauty of using iPhone data cleaner is that once video files are removed from your device, there’s no way they could ever be recovered. This is perfect for users giving away your iOS devices to your friends or relatives and selling them on eBay. Moreover, this tool is compatible not just with iPhone but with all iOS gadgets including iPad and iPod Touch.
How to delete video from iPhone is easy with the above tips and tricks. But to safeguard your privacy, choose a tool that can permanently erase videos. Bear in mind that deleting videos directly on your iPhone doesn’t mean that they are gone forever. Recovery tools can still be used to retrieve those videos on a secondary iPhone. To permanently and securely remove videos from your iPhone, better use a premium iOS data cleaning software.


Leave a Comment